


Sony A7RM4 Load Camera Settings
Set up your Sony Alpha 7R IV from this free Camera Settings file copied to your memory card.
These Camera Settings or CAMSET file is designed to help you set up your A7RM4 as outlined in the A7RIV eBook that is available to my Premium and Premium Plus Patrons.
The camera settings include a different configuration of custom keys when shooting movies and an alternative camera setup file for shooting in studios (to include ‘Shot Result Preview’ and ‘Aperture Preview’ that I discuss in my ‘Finder and Monitor’ video tutorial) and also all of the items in My Menu (as outlined in my A7RIV eBook).
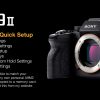
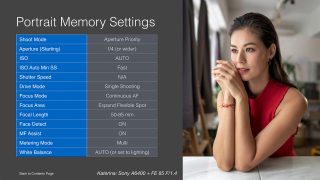
The registered Shooting Memories include Zebras with the level set to Lower Limit 109+. The Zebras are off by default in the Portraits and Action memory Settings but now switched on for the Hand-held Landscape Memory Setting. When zebras show, the overexposed highlights can no longer be recovered when shooting in the Raw file format – this will help you to ‘expose to the right’ whenever possible.
To access this CAMSET file and the supporting 500-page eBook go to: https://www.patreon.com/markgaler
As a Patron you will also have access to extensive learning resources. A $10.00 one-month membership will give you access to 20 eBooks, 20 member-only 1-hour seminars. Alpha Q&A forums are also available for my Premium Plus members. There is no contract and no commitment beyond the first month. https://www.patreon.com/markgaler – you can join, download the eBook or all eBooks and then cancel your membership one hour later if you so wish.
Related products

A7III-A7RIII Custom-Settings and Support eBook: Version 3.10 Firmware
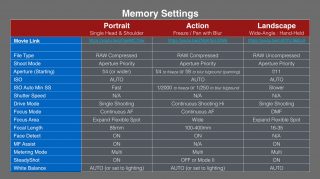
Set up your Sony Alpha A9II from a Camera Settings file copied to your memory card.
E-Books
This eBook offers you learning supporting and contains links to more than 36 video tutorial to help you master the craft of taking creative photographs.
Camera Settings
This Guide has been designed to help you resolve the most commonly encountered problems when using the Sony Alpha menus.
Learn
This eBook offers you learning support to help you master the craft of taking creative and technically excellent photographs. The eBook includes links to 50 video tutorials.
This is a 500-page eBook in PDF format for the A9 and A9II cameras. It provides you with learning support to help you create custom camera setups.
E-Books
This eBook offers you learning supporting and contains links to 42 video tutorials that will help you master the craft of taking creative and technically excellent photographs.

E-Books
This eBook will help you get up to speed as quickly as possible. It will guide you on how to create a custom camera setup optimised for your creative workflows.